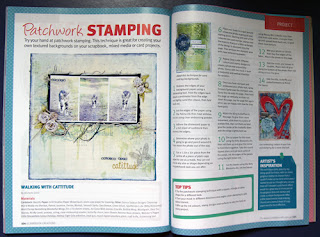
Walking with Catitude * Donna Salazar Designs* & Video Tutorial on Background Stamping
OK, I think I am getting over my week, having a day just creating yesterday helped a lot! Will share more of that when I photograph the projects. It has been a nice change of pace for the weekend. I am feeling a lot better now! Thank you everyone for your beautiful words of advice and support! Really does mean a lot! So Thank you from the bottom of my heart!
On some other news I have just announced I will be having my first weekend workshop in Mackay on the 16th & 17th of March. I have just put a call out for expressions of interest, also if any one knows of any good venue’s I should look into I would really appreciate it!
Welcome back, Today I have another video tutorial on creating your own background with Donna Salazar’s stamps & Mix’d Media Inx & Smooch Sptitz. I have also used the Spellbinders Bitty Blossoms on this layout! They are so gorgeous and perfect for creating flowers to suit any project.
To give your bling butterflies more movement stick them to a piece of acetate, then cut it out and glue the center of the butterfly down with the wings slightly bent up.
After cutting the leaves from the bitty blossoms, ink with Mossy Mix’d Media Inks then mist with water and crumple up to give the leaves more texture.
Here is the Video Tutorial on creating the patchwork stamped background!
String Clear Embossing Powder Butterfly charm Jenni Bowlin – Reverse Navy Stickers Websters Pages – Little storytellers Colour Holiday Plain Copy Paper to make a mask Adhesives Helmar Tiger Grip
Tools Heat Gun
Thanks for dropping by! Have a great day! Cheers Michelle xx
Michelle, just love this layout and video. thanks for sharing your talent. I hope to try this out this weekend. One question, maybe post to my blog, I see you distressed the edges of your layout, so what did you do to to get the white framed line edge just inside the distressing edges? Did you flip the layout and score? use an white ink pen? thanks for your help on this…
Fabulous tut Michelle! I so loved the final product with all that glorious spritz and textures. Can’t wait to give this a try. Thanks for sharing your art with us.
Awesome tutorial Shel. Love all the textures in this….everything about this page is gorgeous. Going to play with inks with you in a couple of weeks….wahoooooooooooooo


Comments
Michelle, just love this layout and video. thanks for sharing your talent. I hope to try this out this weekend. One question, maybe post to my blog, I see you distressed the edges of your layout, so what did you do to to get the white framed line edge just inside the distressing edges? Did you flip the layout and score? use an white ink pen? thanks for your help on this…
Fabulous tut Michelle! I so loved the final product with all that glorious spritz and textures. Can’t wait to give this a try. Thanks for sharing your art with us.
Awesome tutorial Michelle!!! I am totally going to try your drippings look! Just love the blending of your colors! Thanks sweetie! Hugs!
wow thanks for sharing this fabulous tut … xoxo
fantastic background.. thanks for the tut! the colors matches the lovely pics so beautifully! xxx
Awesome tutorial Shel. Love all the textures in this….everything about this page is gorgeous. Going to play with inks with you in a couple of weeks….wahoooooooooooooo
so totally enjoyed your tutorial Michelle… such awesome techniques… thanks for sharing xx
wow, love this, thnx for the tutorial! Gorgeous piece. New follower 🙂
Hugs and happy day, Wendy
Beautiful layout. Adorable cat. Thanks for sharing.