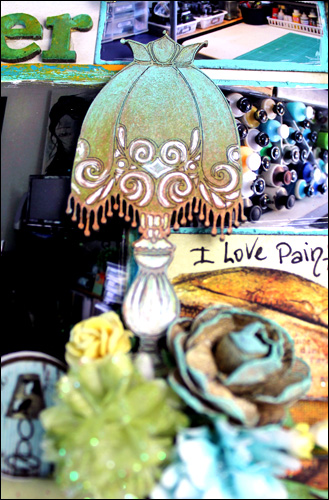
I have used a mix of spray inks and paints to do the finishes on the dusty Pieces.I will have a tut soon on how to do the lettering on dusty soon.
I have used white and copper gel pens and a green zig pen and finished with aqua paint to get this effect on the lamp. I just played with blending and overlapping the colours until I washappy with it.
Now if you would like to follow me I will now take you on a tour of my little studio…..Keep Up Now…. 🙂 LOL
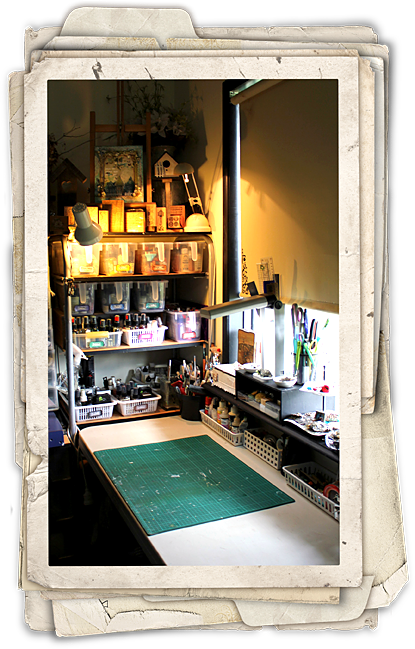
This is all the desk space I have to work on. I don’t think it would matter if I had bigger, I would still manage to fill it up and still have no room. My Scrap Studio/Office is only a 3m x 3m room and she is packed full to the brim. I am building a new spacious studio soon I can’t wait!!
This is my office corner for the computer and a little tv (which I can’t watch yet until we get an Ariel wired in) The set of draws on the desk are new and are making my life a lot easier. each draw is for a different job or project I have on. Is so much easier than having a pile of paper work pile up in the corner. Don’s Dad made this desk for us many years ago, it has definitely stood the test of time! The Canvas in the background was painted by my daughter Leonii.
Don’s Dad also built these draws for me to measure too. the bottom two draws is actually one draw and holds all my patterned papers. I have paper, photo paper and printer inks in the top draws then pencils/ crayons etc. Misc alphabets in a couple of draws and all my masks. The bookcase beside that holds mainly sketch books that I have sketched layout ideas into. Beside that is a white cupboard that has all our bookwork in, it generally hides behind the door.
Everything is pretty much within reach around my desk. Its nice and compact, but that is out of necessity.
This is my trinket trays, inspired by Soul Sister Mistra after we hit the markets in Perth and seeing Mis’s Trinkets all pretty in little saucers and tea cups. My good Friend Bev gave me the two tiered plates for Christmas! There were perfect!
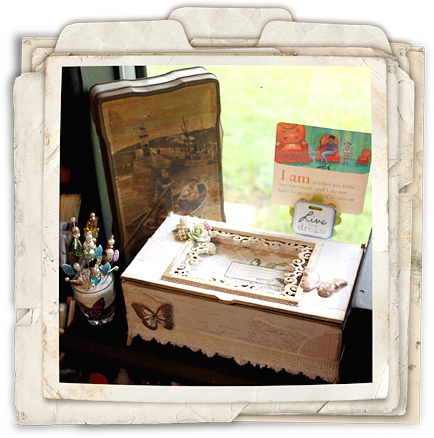
Speaking of Mistra she made this gorgeous Trinket box for me too, It is perfect for my Bling and Pearls! The tin behind the box was a treasure I found at my Grandma’s place last year. I now have more trinkets in it too after being inspired by Finnabair’s Treasure boxes. I made the little hat pin holder out of a shot glass and stuffing it with a bit of foam that you get from different brad holders. Most of the hat pins here were made by my good friend Tina in WA. Those WA girls are too good to me! 🙂
This was another Treasure from Grandma’s this is a draw from an old sewing machine stand. It is perfect for holding the wood stamps in.
To the left of my desk I have my ink and medium station. I just haven’t been able to find the right baskets for these so it is still a work in progress, I am designing trays that will hold these perfectly!!I can’t wait!
I sort my mediums by colour, actually I sort a lot of my stuff by colour.All my ink’s, embossing powders, glimmer mists etc go in these together.
I find I use a lot more of my supplies this way as I don’t think to look through each mediums basket. I use sticky dots to add the colour of each medium to and put it on the top lid. This helps to see what the colour will look like at a glance. I also emboss half of the lid of embossing powders too. Just be careful to not melt the soft plastic lids of some of them.
This is my wall of colour, just about everything here is sorted by colour!
There is lots in this little section. The blue and green folders up the top now have my Dusty Attic in them. They are sorted into the categories according to the web site. These are great as it doesn’t matter if they are in packets or not. I have stamps and alphabets in the other baskets up the top. Next there are a heap of brad and eyelet containers then followed by paints and pens. Under that is different Die Cuts and white flowers and leaves in the plastic containers. On the bottom is my Sewing Machine and Cuttlebug. The plastic Draws to the right have mixed media bits and pieces.
I love having the paints like this it is so easy to find and use from here. I wish I could find more of these containers, are are hard acrylic squares and some cross dividers in them.
Just a view from the other end. Everything in this room is just supporting itself. I have got draws holding up shelves and shelves lying sideways on top. so nothing is built in here. I have basically put all this up myself. I am forever re organising things to make the space more streamlined.
I love my wall of colour. These are my favourite draws. I used to be able to get them from Bunnings but they don’t stock them anymore! 🙁 They are great because the draw just comes out while you are working with it and when you are finished you just throw everything back in the draw and put it back away. They used to come in a set of 3 or 4 draws and you could take the tops and bottoms off and join them together. I have flowers, buttons and beads up the top.
These containers come from Woolies. I have been collecting them for about 6 years Every now and then I would grab a few more with the groceries. They are perfect for the flowers and buttons. I love that you can get your hand in the tops and they are plastic so no chance on them smashing. They are also a lot lighter to sit up on a shelf.
The key to any good organisation is to label everything. I would be forever going around in circles if things weren’t labelled. These draws have all my ribbons and bits and pieces of embellishments by colour.I have a row of Themed Draws with rub on’s Words and Stickers etc1. Holiday/ Beach/ Travel2. Celebrations/ Christmas3. Wedding/ Love4. Sports/ School/ Music/ Pets
5. Friends
6. Boys
7. Girls
8. Baby/ Family
9. Grandparents/ Heritage
10. Sentiments
Then I have a row of Light Colours of each shade
then Bright Colours And Dark Colours.
And on the right is a row of Paper Scraps by colour.
I only put square or rectangle pieces of scraps in these draws, I always trim off any uneven shapes.
And just to show you, my room doesn’t always look that tidy, this is after one project!!!At least it is quick and easy to put everything away.
I hope you have enjoyed the tour through my little room! It really is my Happy Place! :)Thanks for Dropping By!!CheersMichelle xx
This is just a quick tip on how I store my Dusty Attic Chipboard.This
is still a work in progress, I just got a new label maker so I still
have to label all my files properly. I store my Dusty in A4 Keji Carry Files. They are a perfect size for most of my Dusty.I store the 12×12 size Dusty Pieces in a 12×12 Work in Progress Display Folder.I picked the Keji Carry Files up from Officeworks in Mackay QLD. I
can’t remember how much they were. I think they were around the $5.00
mark, but don’t quote me on it!They are 265mm(W) x 345mm(L) x
42mm(deep) and holds so much dusty. It works just as good for the
pieces without packaging too.I would love a clip it up but just don’t have the space in my current Studio/Office.
As you can see they hold quite a bit of Dusty Chipboard…..
Labelling is the most important part of any Storage System.I am in the process of organising my dusty into the categories that are
on the Web Site. You can find the list of Categories here:http://thedustyat.cart.net.au/I
have a couple of categories in some of the files, so I have added the
category names to the spines of the files, then I have listed the items
in that category on the front of the folder. It helps to find what you
are looking for quickly.The best part of this storage system is that it is portable too, easy to grab if you are off to a crop.
I store these at the top of my Shelves in the top right hand corner of this photo, they are quick and easy to grab from here.
I hope this tip has given you another idea on storing your Dusty Chippies!TFLHave a great Day!HugsMichelle x