Navigate / search

Crafty Crusaders ~ Setacolor Fabric Flowers

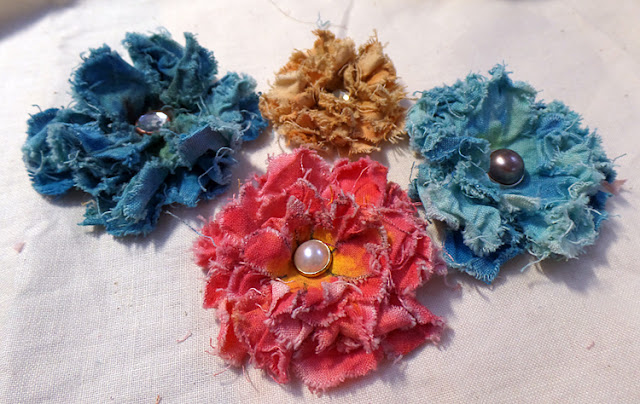
Creating these gorgeous Fabric flowers with the Pebeo Setacolour Fabric Paints is super easy.
All you need is a some calico, Setacolour Fabric Paints and decorative brads,
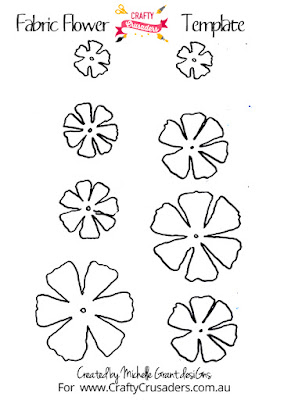
I have created a template you can use to cut out the calico flowers.
You can download this template from HERE
Once the template is printed just lay the calico over the template and draw the flowers on the calico with a pen.
Paint the colours you want over the flower I have used Cherry Red and Buttercup on this flower.
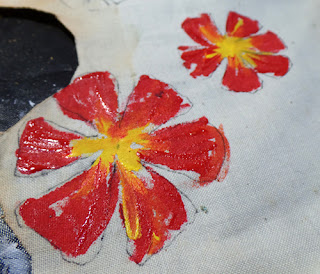
The thicker you add the paint and more solid will give you a darker colour.
Spritz the flower with water and then lay another piece of calico over the top to imprint a second flower, this also blends the colour in the flower.
 

 You can keep spraying the original painted flower with water and lay a blank piece of calico over it to create an imprint. You can imprint more than one copy from one flower onto another piece of calico.
 While the flowers are still damp cut them all out.
 Then roll them up into a ball in the palm of your hand.
 Unroll them and layer up the flowers and then attach together with a brad. You will need a craft knife of poker to poke a hole through the calico for the brad.
 Oriental Blue, Chamois and Buttercup was used on this flower.
Orange, Chamois and Buttercup was used on this flower.
If you
want your flowers to be darker and richer in colour you can add less
water over the flower and don’t imprint off the original flower.

Zen Feather Girl Colouring In Printout ~ Crafty Crusaders

 Have you seen that you can get colouring books for adults now, it is a great way to relax and unwind.
I thought I would have a go of drawing a colouring in page for you. This is so much fun.
I first drew an outline of my girl and design in pencil and then went over the lines with the Black Mepxy marker and a fine black sharpie pen. Then rub out the pencil lines.
I have done it already for you here if you would like to print out this Zen Feather Girl and colour one in for your self. This is a great way of practicing shading on faces with different mediums.

You can download your Printout HERE

I have used Pebeo Studio Aquarelle watercolour paints to colour her in and added a few more details like the eyelashes with a pencil.

If you are printing the printout on an inkjet printer and you are using watercolours you have to be careful of the ink running. The image below was printed on watercolour paper on an inkjet printer.

I hope you enjoy getting back to your childhood and having some colouring in fun!

I know I did!

Have an awesome day 🙂


Brisbane Scrapbook & Papercraft Expo ~ 2015

 You might have heard a little rumour by now that I am teaching at the Brisbane Scrapbook & Papercraft EXPO again this year on the 6, 7 & 8 of June 2015. Not only will I be teaching I will also have a stand and will have some pretty awesome new products and lots of kits available.

Scrapbook_website_2015.indd

We are getting so Excited!!! Places are filling really fast and the
Expo Mag should be out in the this week. So if you want to beat the next
rush of bookings you might want to get in now!

Session 1 Painted Effects by Heather McMahon
Session 3 Innovative Stamping Preview by Fiona Paltridge
SAMSUNG CAMERA PICTURES
I am already booked out on the Saturday with Monday almost fulltoo. I also have Fiona Paltridge  & Heather McMahon teaching for me too, their Classes are also filling quickly.

You definitely wont want to miss these!
You can book into the classes here: http://scrapbookexpo.com.au/…/brisba…/expo-classroom-7-2015/

Don’t forget we have an awesome Prize draw for those that book into all
3 classes in Classroom 7. (doesn’t have to be all on the same day) You
definitely want to be in the running for those, it will be win win then,
3 Awesome classes with some pretty exciting new products and inspiring
techniques. We can’t wait!!!! We will also have more prizes to give away
from our Amazing Sponsors in each class too.

To get more sneak
peeks (coming this week) and to get to know your tutors make sure you
like, comment or even share our Facebook page so that it continues to
show up in your news feed.

Studio M class 7

Check out our facebook page Here for Classroom 7 – https://www.facebook.com/studiomclassroom7

 Thank you for dropping by ! 🙂
Cheers
Michelle

Easter Card and Challenge ~ Mepxy Markers & Canson for Crafty Crusaders

  Happy Easter to one and all! 🙂
Are you looking for something for the kids to do this Easter?
What
better way to keep them busy than to set them a challenge to design and
colour their own eggs and make a card. Heck this is even fun for the
adults to do too.
These are super easy to create and so much fun, you can really let the imagination go wild!
I have included a blank egg template that you can print out and create your own designs
as well as the printout I have designed for you and you can also download the coloured version too.
Step 1: To create this fun card and to create your own egg designs all you need to do is draw some egg shapes or download the black egg template PDF and draw some patterns on them with a black pen.
Step 2 – Once you have drawn or printed the designs then you can colour them in. I have used the Mepxy Basic Design Markers and the Pastel Brush Markers to colour in these eggs.
The colours I have used on each egg has the codes beside the coloured eggs.

  Step 3 – I have used a white gel pen to add a little more detail to some of the designs.

Step 4 – Now to Create the Card. Cut a piece of the Canson Coloured Card (A4 White 185gsm)
to 7″x8″ and then from one end score 2 lines 1″ and then 2″ and score a line 5″ from same end.
Step 5 – An easy way to score a straight line is to use the groove in your paper trimmer and a stylus or a retracted pen to run along the groove. Super easy Scored straight line.
Step 6 – Fold the card along the 3 scored lines.
Step 7 – Add the cut out eggs to the front of the first folded peak and also to the back fold. Making sure that the back eggs go up to the top of the card.
Step 8 – Cut around the bottom and top of the eggs. Making sure some of the top stays attached to the back fold at the top of the eggs.
Then you have a fabulous 3D card that stands up and gives the eggs a 3D look.
Now it is your Turn!!!!
We would love to see your fabulous egg creations!!
Make sure you share them with us over at the
Crafty Crusaders Facebook Page!