Navigate / search

Crafty Crusaders ~ “Rise From the Sea” Pebeo Vitrea 160 Glass Painting
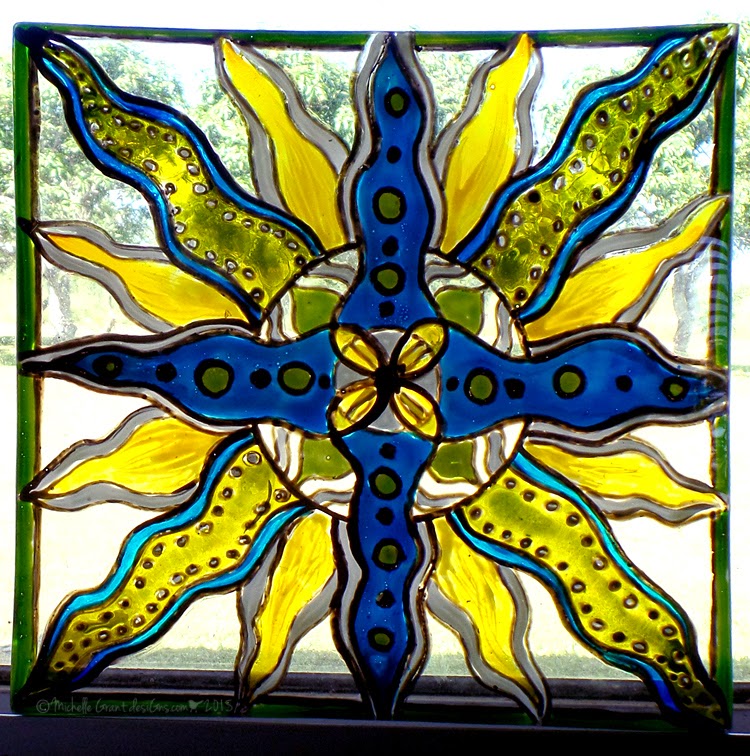
“Rise from the Sea” ~ Pebeo Glass Painting with Vitrea 160
I am loving the chance to explore all these new mediums with the Crafty Crusaders Design Team!!
I have loved everything so far and these Pebeo Vitrea 160 Glass Paints are no exception.
This was so much fun and so easy to create! You really are only limited by your imagination and if imagination is a problem there are so many different designs out there and online to inspire you.
I have drawn this design from scratch that you will be able to download and printp out too. I have left sections in this plate design clear, I like how it changes the look of the plate depending on the background that it is sitting on. When I finished this design it reminded me of elements from the sea, turned different ways I could see a turtle, starfish and octopus legs and then the yellow sections remind me of the sun, so rise from the sea it is! LOL


*****TIP*****
When you are working with new mediums and colours for the first time, a handy tip I find helps me to get to know my colours and mediums is to create a colour template.
If you create it on a piece of acetate you can place it over different things to see how the colours look next to each other. Paint your mediums on the acetate over a piece of white paper. I store them by hole punching the acetate and adding it into a ring binder folder with the white paper in-between.
Don’t forget to name the colours as you go so you can easily find what you are looking for.

Colour Template on an Acetate sheet.
 With the Acetate over Grey paper to see how they change with different colours.

Now for the fun part lets make a pretty plate….

 Step 1: Draw a design that you want to use. I started with 2 circles and then drew 4 squiggly patterns to go out to the corners of the plate. Add some lines and circles and overlap patterns as you go.
Step 2: You can use a black pen to draw your design then use a white out pen to change some of the overlapping lines.
 You can download a PDF of this template to use HERE
Step 3: Outline the back of your plate design with the Vitrea 160 Black Pen. Because my plate is slightly curved I have a piece of foam under the plate to hold the pattern against the class, I have also used a little double sided tape to hold it in place.
Step 4: Go back over some of the lines if needed with the black.
Once you are happy with your design you can start colouring it in, 🙂
Step 5: Apply the Azure Blue to the section below. I found it easier to add blobs of the paint by pressing the end down and then spreading out the colour.
*****TIP*****
If you want to experiment with colours before trying it on your glass products you can place a piece of acetate over the design and play with different colours first.
Step 6: Using the Vitrea 160 pens, Apply the Turquoise to outline the other pattern then colour in with the Sandlewood Green.
I have also applied the Sandlewood Green to the small sections outside the center circle.
Apply the Aniseed Green to the spots and 4 leaf shapes around the middle.
Then apply the Citron Yellow to the center pieces and the outside shapes.
The rest is left clear at this stage.
 Step 7: Using the Brilliant 20 Veil White apply over the aniseed green with a brush on the dots & leaf pattern to make them less transparent and to make the colour more vibrant. Also apply white over the small circles down the pattern.

Step 8: Brush a little of the white over the yellow from the center out to add a variegated colour from opaque to transparent. this gives the colouring more depth too. I also applied white around the yellow outlines and in the center line patterns.
 

Step 9: I then decided to cover the blue center pattern with the white to make it more opaque and to make the colour pop a little more.
Step 10: I applied the Aniseed green to the outside edge frame and also added white over that.
Step 11: Leave to fully dry in minimum 24 hours then bake in an oven for 40 minutes at 160°C (325°F) (steady temperature) Place in a cold oven then when the temperature reaches 160°C bake for 40min then leave to cool in the oven. Is Dishwasher safe, washed on economy.
Love the effect it has up against natural light 🙂
Thanks for Looking xx

Crafty Crusaders ~ Canson Art Book, Schmincke & Mepxy

Hello there, glad you could join me today, I hope you enjoy this little tutorial on how I have created this art journal page using the
Canson Art Book 180 & Schmincke – Acrylic inks & Aquarell & Mepxy Brush Markers.

Can I just say, my fave latest products to use! These are so yummy to work with!!! So many ideas are flowing right now!

Believe-by-Michelle-Grant-1


1.
To start draw a light pencil outline of the face you want to use.
2. Then use the Schmincke Aquarell Maskierstift to go over your pencil outlines. Let dry before adding your colours.
I Love how the masking fluid comes in the easy to use applicator!

1-Outline-face
2-Mask-the-Outline


3. Use different stamps to stamp and a permanent black ink around the hair overlapping them as you go.
4. Drip the Schmincke Acrylic Ink over the hair area, I have used a little of the Primary Blue Cyan and mostly Primary Magenta & Yellow.

3-Stamp-diff-designes-in-bl
4-Drip-Schmincke-Inks


5. Spritz the ink with water so that it blends and runs,  then I have used a baby wipe or paper towel to dab off the excess and to dab more colour on around the edges. If too much ink went onto her face I used a baby wipe to wipe it off.
*** Note*** I would add the blue first next time and let that dry before adding the magenta and yellow. I think this would give it an even more vibrant colour variations.

5-Spritz-with-water-and-dab
6-coloured


6. Once the ink is dry you can rub off the Aquarell Masking Fluid.
The easiest way I found for removing it was by rubbing over it with a paper towel. It came off easily.

7-Rub-off-the-Mask
8-Masking-fluid-removed


7. Now you can colour in your face with the Mepxy Markers. I am still learning how to use these, but I am quickly falling in love with them.

9-mepxy-markers


I finished off some of the finer details with a pencil. So happy with how she turned out!!!

Believe-Art-Journal-Girl-by


Materials Used:
Canson ~ Art Book 180 A4 96gsm
Schmincke ~ Finest Acrylic Ink -Primary Magenta, Yellow & Blue Cyan| Aquarell 731 Maskierstift Masking Fluid |
Mepxy ~ Brush Markers – N25, N03, N25, N01, W13, W04, R00, R02, N51, 00, G02, B12, C02,120

Other:
Stamps | Black Ink – Archival Brilliance Graphite Black

Cheers
Michelle