Navigate / search

Harlequin – Donna Salazar Designs & Emboss Gloss Embossing

Isn’t this year just flying by, I swear the years are going quicker and quicker each year.
Hi there, Michelle back again with another layout created using more gorgeous Donna Salazar products with a simple Emboss Gloss tutorial tip.
I was lucky to snap this gorgeous pic of my DD Leonii as she was going to a fancy dress party. I created the frame in photoshop with Digital brushes from HERE
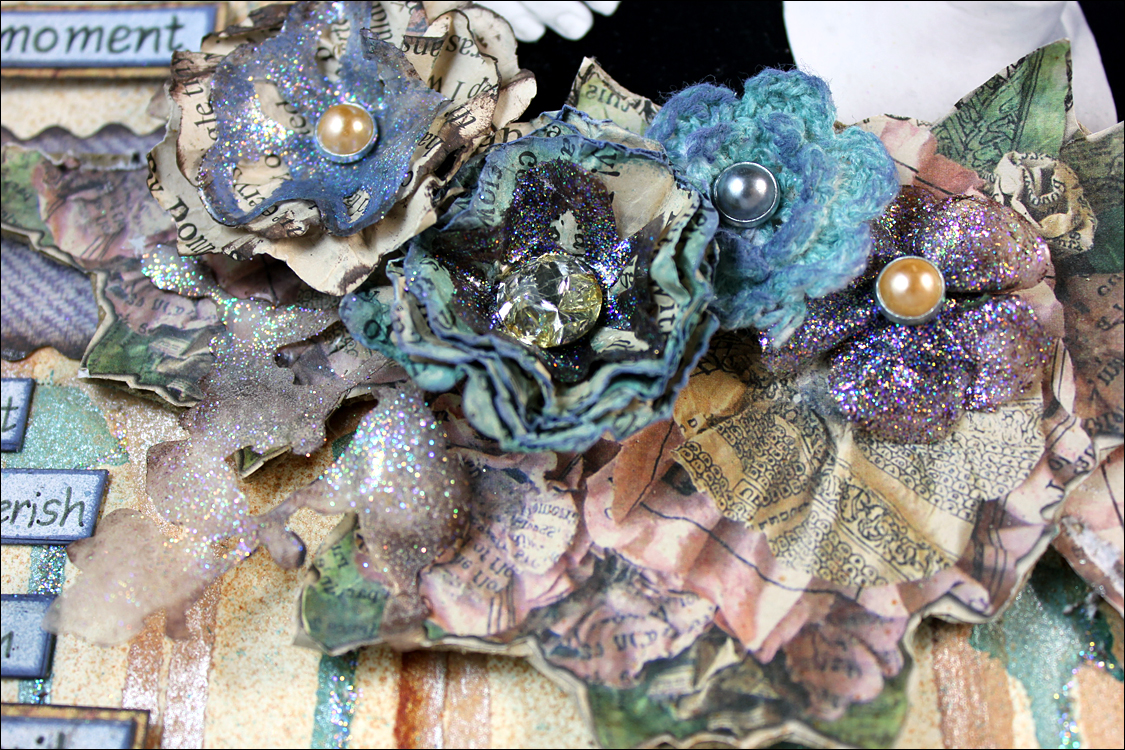
I have used the Spellbinders Bitty Blossoms to make these flowers.
Emboss Gloss – Embossed Title Tutorial
The Emboss Gloss stick is perfect for embossing small Alphabet Stickers. You can get a gorgeous range of colours in the Mix’d Media Embossing Powders. So the possibilities are endless, you can change the colour of any lettering to suit your projects.

To complete this tutorial you need and Emboss Gloss Stick & Mix’d Media Inx Embossing Powder. A sheet of Alphabet stickers and a heat gun. And tweezers are handy for doing this technique too.

Step 1: Using the emboss gloss wand paint over the letter that you want to change the colour of.
Try staying inside the lines of the alphabet stickers with the Emboss Gloss as this makes it easier to remove the sticker after you have embossed it.
Step 2: Sprinkle the embossing powder over the Emboss Gloss.
Step 3: Heat set the embossing powder with a heat gun.
Step 4: Use you tweezers to remove the letters to add to your project.
Easy Hey! 
Paper:

Bling:
Stamps:
Ink:
Embossing Powder:

Dies: 

Other:Basic Grey Alphabets
Feathers
Lace
Green Tara Sprays

Adhesive:
Helmar Tiger Grip
Scrapbook Adhesives: 3D Foam Squares
Double sidded tape

Thanks for dropping by!
Have a great day!
Cheers
Michelle xx

Mobile phone pouch ~ Donna Salazar Designs

Back again, this time with something a little different! I have been walking for awhile and always take my mobile with me, It’s a necessity out here when you walk the back tracks with the snakes & dingos etc around. I also use it for tracking our distance etc too. Anyway I don’t always have a pocket on my clothes to put it in and have to hold it or put it in my bra.
Then I had a brainwave to this problem when we had to use the canvas and denim this month. So I had a play and come up with a mobile phone pouch! It is perfect, small and light enough to be comfortable and out of the way when I go walking.
 Steps for Making This Mobile Phone Pouch ~
Step 1: Cut 2x canvas rectangles approx 10.5cm x 14.5cm then spray with Smooch Spritz (Green Olive, River Mossy, Candle Glow) Then lightly mist with water to soften the colours.
 Step 2: Fold over one end and machine stitch some lace along the top of each piece.
 Step 3: Next I stamped the Swirly Doos Stamp and the Mossy Miz’d Media Inx on each piece.
 Step 4: Now take a piece of canvas approx 6cm x 6cm and fray the edges. Then I sprayed a little of the Candle Glow Smooch Spritz on the mat and sprayed it with water. Drag the edges of the canvas square through the ink on the mat to colour the edges.
 Step 5: Stamp over the canvas square with the Mossy Inx and the Dear Sir Stamp. Emboss with clear embossing powder.
 Step 6: Using the Spellbinders Mix’d Media Elements cut the bird out of the denim, it didn’t cut all the way through the denim but left a good impression to cut around with my scissors.
 Step 7: Next sew around the denim square then sew the bird to the square before sewing to one side of the pocket pouches.

Step 8: Finish off by sewing around the outside of the pouch with a zig zag stitch just in a bit from the edge so that you can fray the outside edge of the stitching. All I did then was cut two small slits near the top edges and threaded a strip of denim through and knotted off each end.
I finished off by stitching a button to the top center with some thread.

It works a treat! I am really happy with it! 🙂

Materials:
Clearsnap

Other Products:
Lace
Button
Thread
Denim Strip
Clear Embossing Powder

Tools
Craft Knife
Sewing Machine


Thanks for dropping by!
Have a great day!
Cheers
Michelle xx

King of the Bush – DSD – Spring in Bloom & Artistic

Hello there! Today we are back with Donna Salazar, featuring the GCD Spring in Bloom Paper collection and Artistic Papers.

My father in law feeds these gorgeous birds, he has a family of them drop in for a feed.

The background on this layout was first inked with the Truffle Mix’d Media Inx then using a brayer layer some of the aqua paint working from the center of the page out. Then using a straw, suck up a bit of yellow paint then blow it out over the page.


Materials:
Clearsnap
Spellbinders
GCD Studios

Other Products:
Matisse – Aqua Green Light paint
Jo Sonja’s – Cadmium yellow light paint

Adhesives – Helmar Tiger Grip  Double sided tape & 3D Foam Tape!
Prima Distressing Tool
Heat Gun.

And I also have a bonus Wedding Card, that I made for a good friend of mine!

Thanks for dropping by! I hope that you will be able to find some inspiration from these!
Have a great day!
Cheers
Michelle x

Friendship ~ *DSD* Spellbinding Acetate Tutorial & Fairy Dust Flower Tutorial

Here is my second project for Donna Salazar Designs to share with you!
I hope you enjoy these couple of quick tutorials on creating
Fairy Dust Flowers and Spellbinging Acetate.
I love working with Donna’s products, they really do give you permission to just play and find your creative expression. I had a lot fun experimenting on this layout!
This is my gorgeous friend Deb Kingston taken on her last visit in Dec.
She really is a beautiful person inside and out!


The Handmade & Cut out flowers were made from the Crafty Chronical Paper.

I just cut rough circles from the Crafty Chronical and scrunched them up before inking them with the mix’d media inx and the smooch spritz. I then added the Fairy Dust Flowers as the centres.
I had lots of fun playing with the Smooch Spritz to create some pretty major drippage on this layout, I love how these inks worked with this Artistic Papers.

Fairy Dust Flowers – Tutorial

To make these simple flowers all you need is a Non Stick Craft Sheet, Mix’d Media Inx, Glossy Accents, Fairy Dust Glitter & Some brads or Gems.


 Step 1: Ink directly onto your craft sheet.
Step 2: Use the Glossy Accents to draw flower
shapes over the ink.

Step 3: Sprinkle your Fairy dust over the glossy
accents while it is still wet.

 Step 4: Leave overnight to dry completely, then peel
them off the craft sheet. You can use your scissors
to trim if needed.

 Step 5: Add a Brad or a Gem to the centre and slightly
scrunch the petals up. You now have a nice little
pliable glittery flower.

 Step 6: I added some of mine to the centre of some
scrunched paper flowers. I love the contrasting 
look against the paper. You can ink the edges in
a contrasting colour for a different look too.

 Spellbinding Acetate – Tutorial
 To create these embellishments, you need the Spellbinders Shadow Flowers, Mix’d Media Inks, Fairy Dust, a piece of Acetate or light Transparency & A Heat Gun.

Step 1: Cut out your Acetate shape from the
Spellbinder Die Cut. If you place a sheet of
patterened paper over the acetate as you cut it, it helps
to give a cleaner cut. You also have an extra piece
cut that you can use on something else later.

Step 2: Ink your piece of Acetate with the Mix’d Media Ink

 Step 3: Sprinkle fairy dust over the wet ink.

 Step 4: Heat with your heat gun, Heat long enough
so that the acetate starts to crinkle up slightly.
This adds a nice dimension to the piece.
If you find that your glitter keeps rubbing off you can
also add a little clear embossing powder to your piece
while you are heating it. I liked the look of it being
more hit and miss than perfectly coated.

Step 5: You can lightly ink the edges in a contrasting
colour to add more depth to your pieces.


Step 6: On this piece I lightly sprayed one end with some smooch spritz.

Materials:
Clearsnap
Spellbinders
GCD Studios

Other Products:
Brads & Gems
Machine Sewing
Crochet Flowers
Masking Tape

Adhesives – Helmar Tiger Grip, Pritt Glue Stick, Ranger – Glossy Accents,
Double sided tape & 3D Foam Tape!
Prima Distressing Tool
Heat Gun.

Thanks for Dropping By!
I hope you have enjoyed these tutorials!
Have a great Day!
Hugs
Michelle x