Navigate / search

Australian Scrapbook Ideas Issue #14

Catching up with some more news here, I was excited and honoured to have been asked to design for the Australian Scrapbook Ideas Magazine. My first article in issue #14 was on Effective ways to create your own backgrounds.

All the Steps to Creating these layouts can be found in the magazine.
This Issue can still be purchased HERE
This Layout of my gorgeous friend Mistra and me was created using a resist stamping and inking technique on the background.
This is my beautiful niece Gracie! She is such a gorgeous little girl! I have used a masking technique with Misting and water colour pencils on this background.

This Photo is of my Great Aunty Dot who recently passed away, I love this vintage photo of her. This background was created using tissue paper to create a textured background.
How cute is this little girl, this is my Cousins daughter Mitali and her Dad Darcy. This was a fun background to create. I have used texture paste, sea shells and egg shells to created this textured background.
Thank you for Dropping By!!
Wishing you a fabulous day!
Hugs
Michelle xxx

Mobile phone pouch ~ Donna Salazar Designs

Back again, this time with something a little different! I have been walking for awhile and always take my mobile with me, It’s a necessity out here when you walk the back tracks with the snakes & dingos etc around. I also use it for tracking our distance etc too. Anyway I don’t always have a pocket on my clothes to put it in and have to hold it or put it in my bra.
Then I had a brainwave to this problem when we had to use the canvas and denim this month. So I had a play and come up with a mobile phone pouch! It is perfect, small and light enough to be comfortable and out of the way when I go walking.
 Steps for Making This Mobile Phone Pouch ~
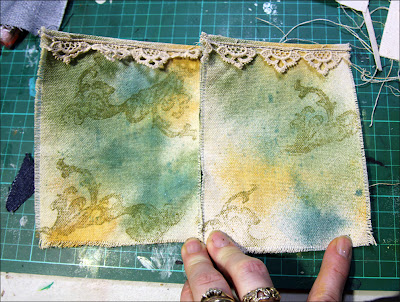
Step 1: Cut 2x canvas rectangles approx 10.5cm x 14.5cm then spray with Smooch Spritz (Green Olive, River Mossy, Candle Glow) Then lightly mist with water to soften the colours.
 Step 2: Fold over one end and machine stitch some lace along the top of each piece.
 Step 3: Next I stamped the Swirly Doos Stamp and the Mossy Miz’d Media Inx on each piece.
 Step 4: Now take a piece of canvas approx 6cm x 6cm and fray the edges. Then I sprayed a little of the Candle Glow Smooch Spritz on the mat and sprayed it with water. Drag the edges of the canvas square through the ink on the mat to colour the edges.
 Step 5: Stamp over the canvas square with the Mossy Inx and the Dear Sir Stamp. Emboss with clear embossing powder.
 Step 6: Using the Spellbinders Mix’d Media Elements cut the bird out of the denim, it didn’t cut all the way through the denim but left a good impression to cut around with my scissors.
 Step 7: Next sew around the denim square then sew the bird to the square before sewing to one side of the pocket pouches.

Step 8: Finish off by sewing around the outside of the pouch with a zig zag stitch just in a bit from the edge so that you can fray the outside edge of the stitching. All I did then was cut two small slits near the top edges and threaded a strip of denim through and knotted off each end.
I finished off by stitching a button to the top center with some thread.

It works a treat! I am really happy with it! 🙂

Materials:
Clearsnap

Other Products:
Lace
Button
Thread
Denim Strip
Clear Embossing Powder

Tools
Craft Knife
Sewing Machine


Thanks for dropping by!
Have a great day!
Cheers
Michelle xx

Ethan – DSD Storybook Magic – Video Tutorial – Creative Backgrounds

These story book papers are so cute for kids pages, I have used these photos of my cousin Toni’s son Ethan from our last holidays to the beach!
I have also done another Video Tuturial, this time on a creative background technique using Smooch Spritz & Rock Salt. I hope you enjoy this tutorial, and thank you to everyone who watched my first one!


This is what these papers loooked like before::

Enjoy this Video Tutorial on a creative background technique:

Materials:

Clearsnap

GCD Studios
Papers
 

Other Products:

Rock Salt
Gesso
Glossy Accents


Adhesives
Helmar Tiger Grip 
Double sided tape & 3D Foam Tape!
Tools
Craft Knife, Fine tip Scissors
Heat Gun


Thanks again for dropping by and checking out my tutorial!
Have a Great Day!
Hugs
Michelle xxx

My Girl – DSD – My fist Video Tutorial – Handmade Flowers with Lace.

Hi there, so lovely to see you here again! Today I have another Donna Salazar Creation to share with you. Using the Beautiful Botanique Paper Range and the Want2Scrap – Build your own Bling.
I have also created my very first online video tutorial. It has been a huge learning curve for me and very nerve wracking. I think I sound dreadful on camera but anyway it is done! I am a little excited that it is done now too! The Video Tutorial is on making your own handmade flowers with the Mix’d Media Stax papers and Lace, with a little smooch and fairy dust thrown in for good measure.
I will also be sharing a tip here on colouring bling to suit your projects.

Here is the layout I have created for this project. This is an old photo of my gorgeous daughter Leonii and myself taken a few years ago. There is lots of fussy cutting on this layout too.

When I am fussy cutting for clusters, I cut out whole pieces and then cut them down to smaller  pieces when needed. Helps to manipulate your fussy cut pieces to fit perfectly into the available spaces.


Coloured Bling Tutorial
 The bling on this layout started out as the clear silver bling. I have coloured them using the Smooch Spritz Sprays. Although these are not permanant inks I found that it held the colour enough for what I wanted here. You can also use Alcohol inks for a more permanent finish.
Step 1: Grab your clear bling, a smooch spritz spray,
I have used the Candle Glow Smooch here and an ink aplicator.
 Step 2: Spay a little of the smooch spritz on a piece of plastic or a craft sheet.
I have used the packet the bling come in here.
Then Load your ink applicator with the ink.
 Step 3: Then simply dab the ink over the bling.
Leave to set for a minute or two then dab off the excess with a paper Towel.
Now here is my first video tutorial! Thanks for watching!


Materials:
Clearsnap

GCD Studios
Papers

Other Products:

Lace
Decorative Brads
Basic Grey Alphabet – Hopscotch Micro Mini


Adhesives
Helmar Tiger Grip 
Double sided tape & 3D Foam Tape!
Tools
Craft Knife, Fine tip Scissors
Heat Gun
Needle & Thread (Handstitching)
Fiskers Border Punch


Thanks again for dropping by and checking out my tutorial!
Have a Great Day!
Hugs
Michelle xxx