OK, I think I am getting over my week, having a day just creating yesterday helped a lot! Will share more of that when I photograph the projects. It has been a nice change of pace for the weekend. I am feeling a lot better now! Thank you everyone for your beautiful words of advice and support! Really does mean a lot! So Thank you from the bottom of my heart!
On some other news I have just announced I will be having my first weekend workshop in Mackay on the 16th & 17th of March. I have just put a call out for expressions of interest, also if any one knows of any good venue’s I should look into I would really appreciate it!
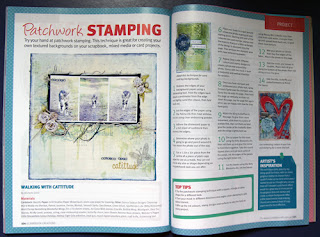
Welcome back, Today I have another video tutorial on creating your own background with Donna Salazar’s stamps & Mix’d Media Inx & Smooch Sptitz. I have also used the Spellbinders Bitty Blossoms on this layout! They are so gorgeous and perfect for creating flowers to suit any project.
To give your bling butterflies more movement stick them to a piece of acetate, then cut it out and glue the center of the butterfly down with the wings slightly bent up.
After cutting the leaves from the bitty blossoms, ink with Mossy Mix’d Media Inks then mist with water and crumple up to give the leaves more texture.
Here is the Video Tutorial on creating the patchwork stamped background!
String Clear Embossing Powder Butterfly charm Jenni Bowlin – Reverse Navy Stickers Websters Pages – Little storytellers Colour Holiday Plain Copy Paper to make a mask Adhesives Helmar Tiger Grip
Tools Heat Gun
Thanks for dropping by! Have a great day! Cheers Michelle xx
Welcome to my first Dusty post for 2013. The theme for this months ATC Challenge is Fairies & Flutterbies. These butterflies will soon be available in the next new release.
Flying Chipboard Butterflies – Tutorial
I wanted to create some butterflies with the appearance that they were flying. This is an easy technique to create movement in your chipboard butterflies. I have used the new Butterflies #3 that are coming out in the next release.
Step 1: I have used 2 medium and one of the small butterflies.
Step 2: Soak the butterflies in water and separate into 3 layers so 3 butterflies then become 9
Step 3: While the chipboard is still wet curl up the edges of the butterflies, then dry with a heat gun. The heat gun will help the edges curl a little more too.
Step 4: Once dry I have coloured them with Smooch Spritz – Citrus Tickle, then painted the edges of the butterflies with white paint.
Step 5: Use two layers of the butterflies for the medium butterflies. To create the body take a piece of craft wire and add some beads.
Step 6: Then fold the wire around the butterfly going between the antlers and around the back.
Step 7: To Make the small butterflies I have used each separate layer individually and gently poked the wire through the middle of the chipboard. Add some PVA glue as you do this to hold it in place.
Hellooooo, How is everyone today?? I this post finds you all well. I am back again with another DT Swap layout, this month I had to do Donna’s photo. This was such a fun photo to scrap! I hope you like it Donna!
Lots of stitching on this one, I have even machine stitched over the chipboard letters. The drips in the background were created by mixing embossing powder with the Mix’d Media Re-Inkers then adding dots of the mixture to the top of the page. Then hold the page up vertically and water spritz over these to create drippage. Once you are happy with the drips you can then heat set the remaining embossing powder. It gives it a nice grainy look like sand particles.
Back again, this time with something a little different! I have been walking for awhile and always take my mobile with me, It’s a necessity out here when you walk the back tracks with the snakes & dingos etc around. I also use it for tracking our distance etc too. Anyway I don’t always have a pocket on my clothes to put it in and have to hold it or put it in my bra. Then I had a brainwave to this problem when we had to use the canvas and denim this month. So I had a play and come up with a mobile phone pouch! It is perfect, small and light enough to be comfortable and out of the way when I go walking.
Steps for Making This Mobile Phone Pouch ~
Step 1: Cut 2x canvas rectangles approx 10.5cm x 14.5cm then spray with Smooch Spritz (Green Olive, River Mossy, Candle Glow) Then lightly mist with water to soften the colours.
Step 2: Fold over one end and machine stitch some lace along the top of each piece.
Step 3: Next I stamped the Swirly Doos Stamp and the Mossy Miz’d Media Inx on each piece.
Step 4: Now take a piece of canvas approx 6cm x 6cm and fray the edges. Then I sprayed a little of the Candle Glow Smooch Spritz on the mat and sprayed it with water. Drag the edges of the canvas square through the ink on the mat to colour the edges.
Step 5: Stamp over the canvas square with the Mossy Inx and the Dear Sir Stamp. Emboss with clear embossing powder.
Step 6: Using the Spellbinders Mix’d Media Elements cut the bird out of the denim, it didn’t cut all the way through the denim but left a good impression to cut around with my scissors.
Step 7: Next sew around the denim square then sew the bird to the square before sewing to one side of the pocket pouches.
Step 8: Finish off by sewing around the outside of the pouch with a zig zag stitch just in a bit from the edge so that you can fray the outside edge of the stitching. All I did then was cut two small slits near the top edges and threaded a strip of denim through and knotted off each end. I finished off by stitching a button to the top center with some thread.